# CosmWasm & LocalOsmosis
TIP
You can now deploy contracts to LocalOsmosis with Beaker (opens new window). The official tooling to deploy Osmosis Smartcontracts.
The following is detailed guide that shows the basics of manually deploying a contract to a Osmosis local environment. It covers:
- Initial Setup
- Rust
- LocalOsmosis via Osmosis installer.
- osmosisd binary automatically configured to connect to your localOsmosis
- localOsmosis setup in the $HOME directory (~/localosmosis)
- Deploy a smart contract
- Clone a base template contract
- Compile contract
- Optimize contract
- Create local key
- Store contract
- Initialize
- Get contract address
- Query contract
- Increment contract's count
- Reset contracts count
- Get contract's state
- Query contract info
- List all contracts
# Initial setup
This tutorial uses a Osmosis specific development tools to deploy contracts to your local Osmosis environment powered by localOsmosis.
# Set up Rust
Rust is the main programming language used for CosmWasm smart contracts. While WASM smart contracts can theoretically be written in any programming language, CosmWasm libraries and tooling work best with Rust.
First, install the latest version of Rust (opens new window).
Then run the following commands:
# 1. Set 'stable' as the default release channel:

rustup default stable

# 2. Add WASM as the compilation target:

rustup target add wasm32-unknown-unknown

# 3. Install the following packages to generate the contract:

cargo install cargo-generate --features vendored-openssl
cargo install cargo-run-script
2
3
4
5
6
7
8
9
10
11
12
# Setup LocalOsmosis
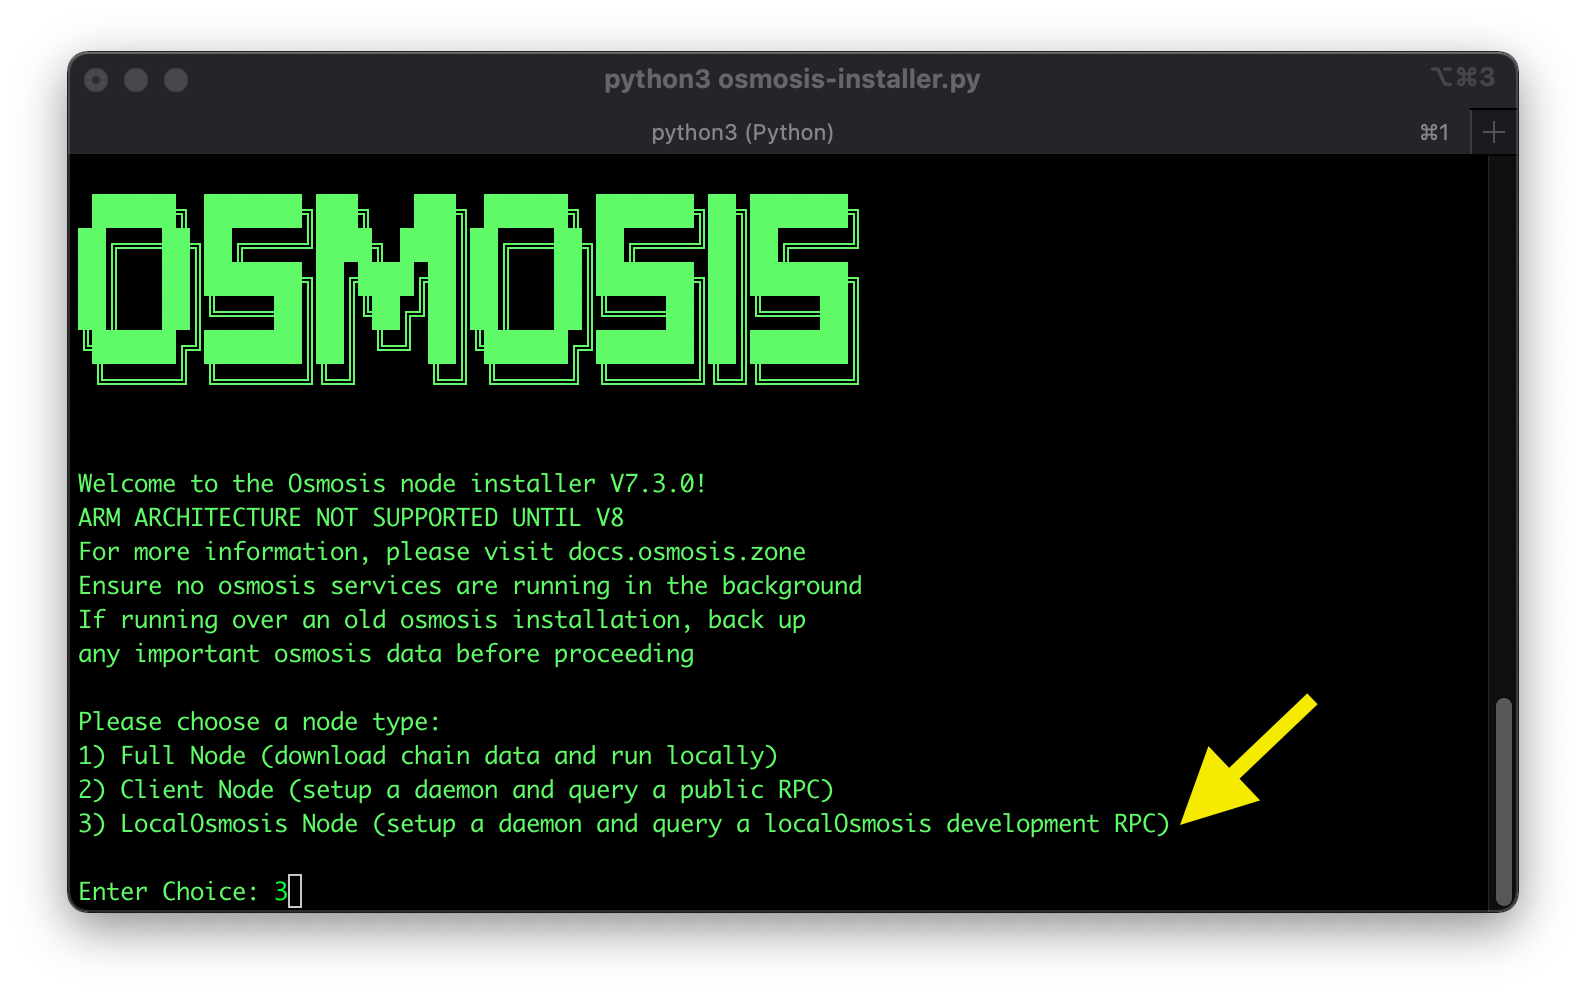
The easiest way to setup your localOsmosis is by downloading the automated installer (opens new window). You can learn more about localOsmosis by reading the README (opens new window) in the official repo.
Run the following and choose option #3.
curl -sL https://get.osmosis.zone/install > i.py && python3 i.py
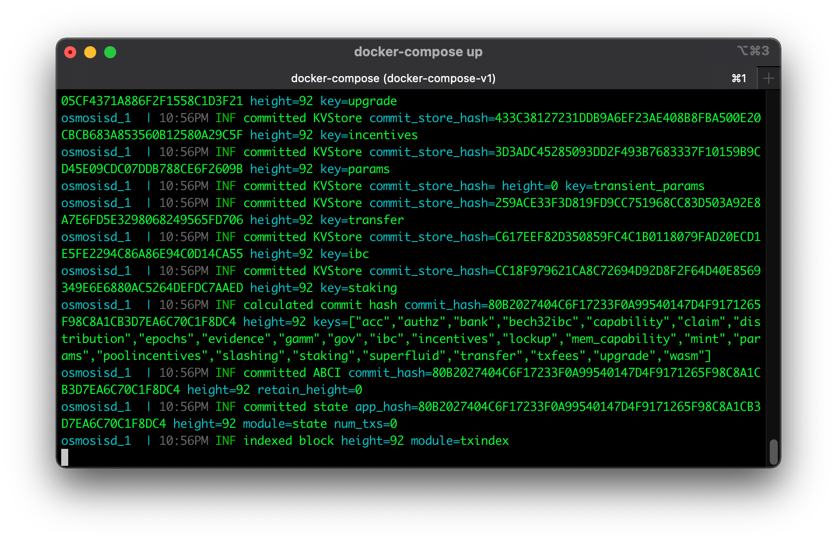
# Start localOsmosis
Inside a separate bash window start your localOsmosis which was installed in ~/localosmosis
cd ~/localosmosis
docker-compose up
2
3
You will start seeing LocalOsmosis block activity in your terminal. Keep LocalOsmosis running while you perform the next steps in a new terminal window.
TIP
To view the LocalOsmosis wallet information, visit the LocalOsmosis accounts page.
# Deploy a smart contract
# Clone cw-tpl-osmosis
For this example we will use the cw-tpl-osmosis (CosmWasm Template Osmosis) repo that was created with the cw-template (opens new window) repo.
git clone https://github.com/osmosis-labs/cw-tpl-osmosis
# Compile the wasm contract with stable toolchain
rustup default stable
cargo wasm
2
After this compiles, it should produce a file in target/wasm32-unknown-unknown/release/cw_tpl_osmosis.wasm. A quick ls -lh should show around 1.8MB. This is a release build, but not stripped of all unneeded code. To produce a much smaller version, you can run this which tells the compiler to strip all unused code out:
RUSTFLAGS='-C link-arg=-s'
cargo wasm
2
3
This produces a file about 149kB. We will do further optimisation below.
# Optimized Compilation
To reduce gas costs, the binary size should be as small as possible. This will result in a less costly deployment, and lower fees on every interaction. Luckily, there is tooling to help with this. You can optimize production code using rust-optimizer. rust-optimizer produces reproducible builds of CosmWasm smart contracts. This means third parties can verify the contract is actually the claimed code.
sudo docker run --rm -v "$(pwd)":/code \
    --mount type=volume,source="$(basename "$(pwd)")_cache",target=/code/target \
    --mount type=volume,source=registry_cache,target=/usr/local/cargo/registry \
    cosmwasm/rust-optimizer:0.12.6
2
3
4
5
Binary will be at artifacts/osmosis_cw_tpl.wasm folder and its size will be 138k
# Created a local key
Create a key using one of the seeds provided in localOsmosis.
osmosisd keys add <unsafe-test-key-name> --recover
Example test1 key from here (opens new window):
notice oak worry limit wrap speak medal online prefer cluster roof addict wrist behave treat actual wasp year salad speed social layer crew genius
# Store to your localOsmosis chain
You can deploy the contract to localOsmosis or a testnet. In this example we will deploy to localOsmosis.
cd artifacts
osmosisd tx wasm store cw_tpl_osmosis.wasm  --from <unsafe-test-key-name> --chain-id=<chain-id> --gas-prices 0.1uosmo --gas auto --gas-adjustment 1.3 -b block -y
2
<unsafe-test-key-name> = Name of your local key.
<chain-id> = localosmosis
Replace <unsafe-test-key-name> with the key name from your local keys. osmosisd keys list
Replace <chain-id> with localosmosis or osmo-test-4.
Save the CODE_ID from the output of the command above as a local variable CODE_ID=XX
# Or Store CODE_ID
Instead of looking for the code_id the command above, you can also run the following command to set the CODE_ID as a variable.
TX=$(osmosisd tx wasm store cw_tpl_osmosis.wasm  --from <unsafe-test-key-name> --chain-id=<chain-id> --gas-prices 0.1uosmo --gas auto --gas-adjustment 1.3 -b block --output json -y | jq -r '.txhash')
CODE_ID=$(osmosisd query tx $TX --output json | jq -r '.logs[0].events[-1].attributes[0].value')
echo "Your contract code_id is $CODE_ID"
2
3
If this is a brand new localOsmosis instance it should be 1
# Instantiate the contract
INITIAL_STATE='{"count":100}'
osmosisd tx wasm instantiate $CODE_ID $INITIAL_STATE --amount 50000uosmo  --label "Counter Contract" --from <unsafe-test-key-name> --chain-id <chain-id> --gas-prices 0.1uosmo --gas auto --gas-adjustment 1.3 -b block -y --no-admin
2
Example
INITIAL_STATE='{"count":100}'
osmosisd tx wasm instantiate $CODE_ID $INITIAL_STATE --amount 50000uosmo  --label "Counter Contract" --from c1 --chain-id localosmosis --gas-prices 0.1uosmo --gas auto --gas-adjustment 1.3 -b block -y --no-admin
2
# Get contract address
CONTRACT_ADDR=$(osmosisd query wasm list-contract-by-code $CODE_ID --output json | jq -r '.contracts[0]')
# Query Contract
# Increment contract's count
INCREMENT_MSG='{"increment":{}}'
osmosisd tx wasm execute $CONTRACT_ADDR "$INCREMENT_MSG" --from c1
2
# Reset contracts count
RESET_MSG='{"reset":{"count":0}}'
osmosisd tx wasm execute $CONTRACT_ADDR "$RESET_MSG" --from c1
2
# Get contract's state
GET_STATE_MSG='{"get_count":{}}'
osmosisd query wasm contract-state smart  $CONTRACT_ADDR "$GET_STATE_MSG"
2
# Query contract info
osmosisd query wasm contract $CONTRACT_ADDR
# List all contracts
osmosisd query wasm list-code
Good job! It's not time to learn how to actually develop contracts. You can now visit the official CosmWasm contracts (opens new window) and as you explore the docs you will understand how tio actually interact with the Osmosis Blockchain.
- Learn
- Medium
- Commonwealth
- Tools
- Osmosis App
- Osmosis Explorer
- Stats
- Osmo
- What is Osmo?
- Pools
- Wallets
- Foundation
- Careers
- Developers
- Github
- Validators
- Validator Guide
- Discord Channel


